Before you can begin entering any Interest Rate Swap (IRS) contracts, it is essential to ensure that all required elements have been set up in the system. These include:
- Relevant entity
- Counterparty
- Portfolio
- Cost center
- Bank account
- IRS instrument type
Only after these prerequisites are in place can new IRS contracts be created. New IRS contracts can be created manually or, by copying an existing one.
When creating an IRS instruments the next steps should be taken:
- Create or modify IRS instrument type
- Create an IRS contract
In the following sections, you will find detailed, step-by-step, instructions on how to do this.
1. Create or modify IRS instrument type
To do this, you should navigate to Settings > Instruments > Debt type and select create IRS from the plus-pen sign.

Alternatively you can modify an existing IRS instrument from three dots and choosing either edit or copy.

You will then fill in the information related to your instrument filling in both legs of the contract – the paying and receiving interest calculation method.

In the debt type form you have the following fields to fill:
- Name: You can give a distinct name to your debt instrument
- Deal type: This selection determines the specific calculation method for your debt instrument. For IRS this is fixed to MMIRS.
- Day Count Convention: The method that determines number of days used in the interest accrual calculation between payment days. Options: Act/360, Act/365, 30/360, 30/365, Act/Act, Act/Act-ICMA
- Business Day Convention: Adjusts payment or interest calculation dates that fall on weekends or holidays to the next business day.
- Fixed loan interpolation method for discounted cash flow valuation: You have the selection between 'Multiple rates based on each payment' and 'Single rate based on maturity date'
- Discount method for floating loan: You have the selection between 'Discounting full payment schedule' and 'Discounting only the first interest flow selection'.
- Price Type: Differentiates between 'Clean' (excluding accrued interest) and 'Dirty' (including accrued interest) prices.
- Display floating interest table: This selection is specific for loans that have a floating interest rate. In order to fix interest rate periodically this selection has to be made.
- Rate can be negative: By ticking this box, you can also insert negative interest rates for you debt instruments.
- Last day inclusive in interest calculation: If you don't have "Last day inclusive in interest calculation" the interest is calculated by including the first day but leaving the last day out. If it is active, interest is calculated ensuring the first and the last day are inclusive.
- Status: You can select the instrument type to be active or inactive in the system
2. Create an IRS contract
First, navigate to Loans & money market module from the left bar and select your IRS instrument from the dropdown that appears as you select the plus-sign from the top right corner or your register page.

Next, you will have an information page opening where you will fill in the mandatory fields and moreover the additional fields.
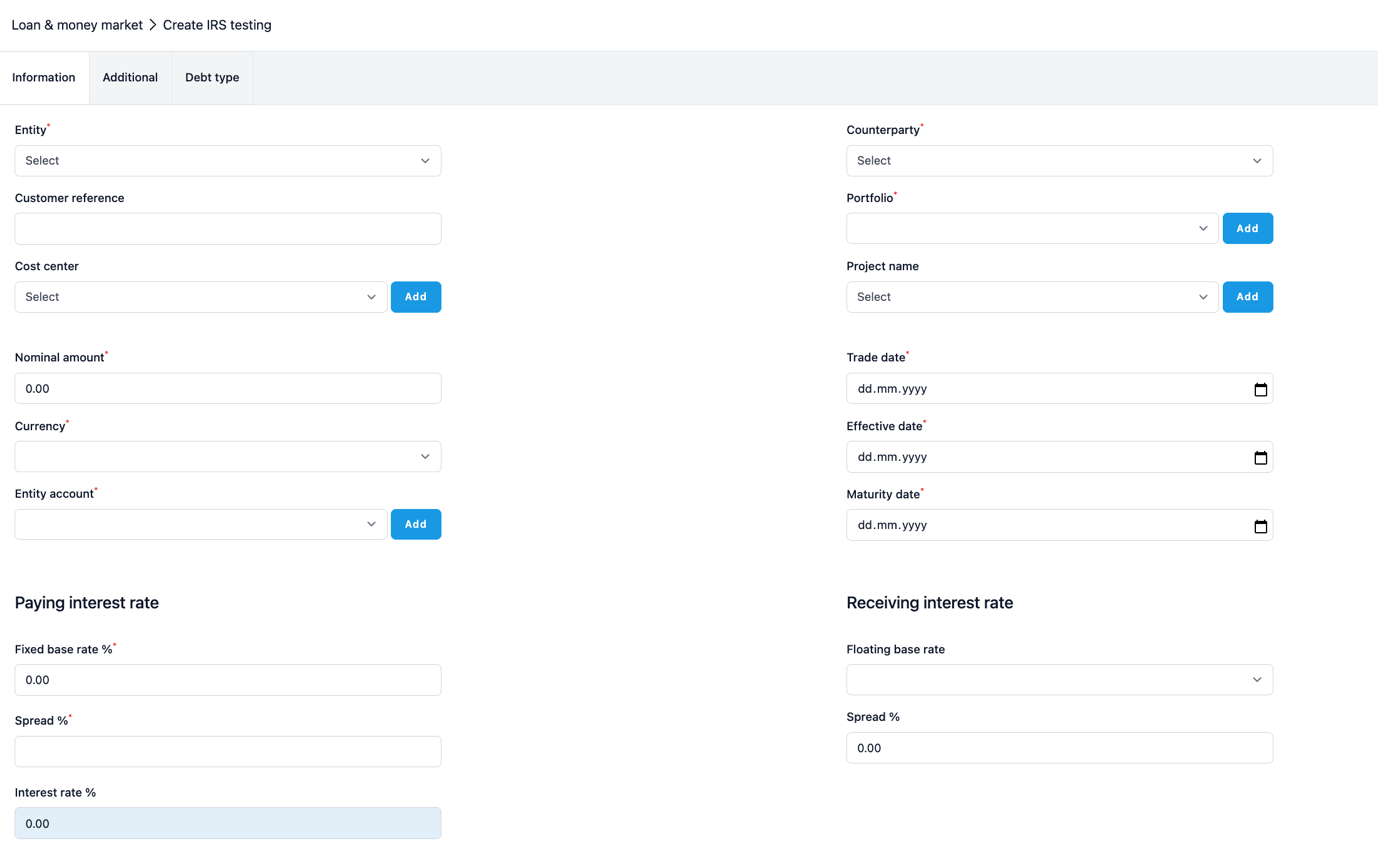
- Choose from the Entity dropdown list the company from whose perspective the IRS contract is created.
- Select the counterparty from the counterparty dropdown list.
- Enter the customer reference in the ‘Customer Reference’ box. This is a reference that you can use to identify the transaction. This field is also visible in the register view. For example, you can put here a recognisable contrac agreement number.
- Choosing one portfolio helps to categorise your data in reports.
- If you need a cost center in your reporting or accounting, choose one.
- You can also define a project name for your contract.
- Enter the transaction amount in the Nominal amount field.
- Choose the Currency of the agreement.
- System will automatically suggest an account that is tied to the currency selected.
- Choose the Trade date (the date when the agreement was signed) from the calendar.
- Choose the Effective date (the date when the first payment happens) from the calendar.
- Choose the Maturity date (the end date of the agreement) from the calendar.
Next, fill in the details related to the interest rates for both legs of your contract.
If yoyu have defined a fixed leg for your contract (you left the ‘Display floating interest table’ unselected on the instrument settings), you can proceed and:
- Enter the fixed rate into the Fixed base rate %
- Enter the Spread %
- The Interest rate % is calculated as the Fixed base rate % + Spread %.
If you have created a floating rate leg or legs (you selected ‘Display floating interest table’ on the instrument settings), you can proceed and:
- Select the floating base rate from the dropdown menu
- Fill in the Spread %
- Add Base rate % for the first interest period
- Fill in the date which is the first day of your IRS contract meaning the date where the insterest calcuation is starting from.
Following these steps, the system starts to read in the right interval within the Money Market rate table to get the next interest rate automatically into the agreement. You can follow the interest fixing details from the ‘Receiving interest rates’ table.

3. Generating payment schedule
After you have saved all this basic information, you can start to create the payment schedule for your contract by opening ‘Cash flows’ tab and clicking on the clogwheel sign.

In the payment schedule, there is first a section where you define how the interest and capital is paid.

If you do not wish to create any interest flow, activate "No interest flow". Otherwise leave it inactive.
- Interest period - In this dropdown, you can choose the interest payment method.
- Interest calculation start date - this is where you define the first interest period start date. The system will automatically insert the Effective start date.
- End date of the first interest calculation period - this is where you define which day the first interest period ends.
- Interest payment day - the actual payment day of the interest
- Interest payment month - this is where you need to specify the Interest payment day. It should be on the same month as the end of date of the interest period, or Next month (+1M) or Two month later (+2M).
- End date - This is the date into which the system ends interest payments. The system will automatically put here the end date of the loan.
Please also remember to check after creating the last interest period. If the period is not mentioned in full, the system will not calculate an interest for it automatically. Then, you need to go into the final payment and add the interest calculation days into the last interest period.
Next you can define the amortisations of the contract principal. If you do not wish to create any loan capital payment flow, activate the option "No amortisations". Otherwise leave it inactive.
Normally there is no capital flow in the IRS contract so you can choose "On maturity date" for for "Amortizations” and select “Save”. Moreover, “No capital flow” selection is active by default for the IRS contracts, ensuring the capital payments will not go into reporting or accounting.
After you have made all selections with your best knowledge, you can click "Generate" and "Save". The system will generate the payment flows into the ‘Cash flows’ page of the agreement.
If you are not happy with the result then you can clear all and redo the flow to get it correct. You can also lock a few payments and then delete the rest by choosing the cash flows next to each payment in the "Lock" tab. This way, you can be sure no one deletes certain payments.
Additional tab
You can write additional things you need to remember out of this agreement into the "Text" field.
‘Confirmation means’ is currently not used anywhere in the system.
The following text boxes are for accounting users: Internal order, tax, and RoU asset number. You can save text or number information to these, and have them as one column in your accounting template. Use it when you import data into your ERP/Accounting system.
Usually, ‘Move to archive before maturity’ and 'Excluded from Accounting and Reporting’ will both be unselected. Tick both boxes if you would like to move a lease to archive before maturity and you don't want it to appear in your reports or accounting.
‘No capital flow’ is active by default for the IRS, ensuring the capital payments will not go into reporting or accounting.
By activating ‘Calculate valuation’ you make it so that the system starts to calculate contract valuation using the discounting method you have chosen to this instrument type. Following activation, you need to go to the ‘Loan valuation’ sheet in this agreement from where you’ll have to specify the yield curve we should use for valuation, and also if we should add a premium on top of the interpolated interest from the yield curve. So, you need to have the needed reference rate quotations in the Money market rates table for this yield curve (for the date you want to have a valuation out of the system). The valuation will come into the ‘Loan valuation’-report and also into accounting.
‘Net interest’ should be activated if you want to net the interest cash flows in reporting and accounting.
‘Net valuation’ should be activated if you want to net the valuation in reporting and accounting.
Audit trail tab
In the audit trail, you can see all the changes made into the agreement on a very detailed level.
Attachments tab
This is where you can save documents in excel, pdf, jpg, jpeg and png upto 5mb. Characters a-z A-Z 1-9 or - _ are only allowed in attachment file names.
Was this article helpful?
That’s Great!
Thank you for your feedback
Sorry! We couldn't be helpful
Thank you for your feedback
Feedback sent
We appreciate your effort and will try to fix the article